Oak Wood Graining Technique
Media Gallery
Oak wood graining is a fantastic faux wood grain effect. With practice it’s rather easy to accomplish, and when compared to buying a piece of oak furniture, oak graining is much less expensive.
Oak is a beautiful hard wood; with lovely grain patterns, eye pleasing color, and a reputation for durability. Oak is highly sought after for cabinets, doors, flooring and furniture, but the high demand for this slow growing wood has depleted its supply (and raised its price tag.) Rather than spend a small fortune on oak furniture, faux oak wood graining can create the look of oak out of almost any wood.
How to create faux oak wood grain
Faux oak wood graining can take on a variety of hues; light yellow/brown (imitating young wood), medium yellow/brown (more mature wood) and finally brown (old wood.) Let’s learn the basics of the faux oak wood grain technique by applying the technique to a side table made of pine.
- Prepare surface. Clean the table with mild soapy water and a damp sponge. An old toothbrush dipped in soapy water will help loosen the dirt that builds in hard to reach places. Let dry completely.
- Apply primer. A quick drying latex primer is an excellent choice. Using a 2” or 3” natural bristle (or foam) brush, apply at least one coat of primer to the table and let dry thoroughly. Something like Bullseye 1-2-3 will work great.
- Apply basecoat. You will use a stain as your basecoat. This stain will serve as your background wood color, so choose the stain color carefully. Apply stain evenly, using a clean cloth.
- Apply glaze. Using a 2” or 3” natural bristle brush apply the appropriate color glaze (remember, the grain will be the color of the glaze, so be sure you’ve chose a glaze that’s much darker that the basecoat, or the grain won’t “pop”)
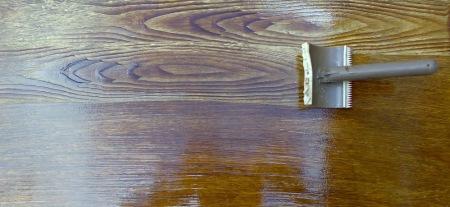
- Grain. One method of creating faux oak wood grain is using a rocking tool. The rocking tool creates the look of grain by removing some of the glaze applied in step 4, revealing the basecoat. The glaze that remains on the table creates the “wood grain.” Basically, you’ll start at one end of the table and work toward the other. Rock the tool forward and backward slowly, while moving it across the table. Don’t overlap the strokes. It takes a bit of practice to master moving and rocking the tool simultaneously. There are two methods of using the rocking tool:
- Half Rocking. Position the rocking tool at one end of the table, with the handle 180 degrees from the table top. Pull the rocker across the table slowly. As you do so, rotate the handle downward, toward the table. The rocking tool will be moving across the table while you “half rock” the tool. Wipe tool clean after each stroke. After the glaze has set-up (but not dried completely) use a natural bristle brush to lightly brush over the grain. This will soften and authenticate the real wood look. Let dry.
- Full rocking. Start at one end of the table (just as you would if half rocking.) As you pull the rocking tool across the table, rotate (or “rock”) the tool all the way forward and back. You’ll end up with a full grain pattern. Wipe tool clean after each stroke. After the glaze has set-up (but not dried completely) use a natural bristle brush to lightly brush over the grain. This will soften and authenticate the real wood look. Let dry.
- Apply protective coat. Apply a protective coat of polyurethane using a foam brush. The polyurethane will also help bring out the faux wood grain.
Tools and materials to create faux oak wood grain
- Drop cloth or other protective material for your work space
- Appropriate tools to remove hardware (if necessary)
- Cleaning supplies to prepare cabinet surface
- Lint free cloth
- Three or more 2” or 3” natural bristle brushes or foam brushes
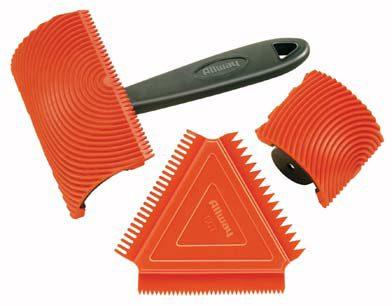
- Rocking tool
- Quick drying latex primer (for example Bullseye 1-2-3)
- Stain
- Tintable glaze
- Polyurethane
The rocking tool is a great choice for those who are just starting to learn how to faux wood grain. Consider purchasing two or three rocking tools in a variety of widths and grain patterns. Using more than one rocking tool will enhance the natural look of wood grain. Another tip: if you vary the speed at which you drag the rocker, or the number of times you rock the rocker- you can create a variety of wood grain looks with just one rocking tool! Most rocking tools are priced in the $5.00-$15.00 range, and can be found in the paint area (faux finishing section) of nearly any home improvement store. A wood grain roller is also a great choice for beginners. A roller works in a similar way to the rocker, except rather than rocking the tool you simply roll it to create the wood grain pattern.
Before you begin your faux wood grain project I strongly advise you to test the stain color and glaze color you’ve chosen on a scrap piece of wood. Be sure the colors “work” together. Then practice the rocking technique until you’ve really perfected it. Remember, using rocking tools in a variety of designs and widths will produce dynamic results when used properly. Finally, be patient. This isn’t a faux technique that you’ll nail down on your first try, but you can (and will) learn how to create the beautiful look of wood grain on furniture.


